Tuesday, October 29, 2019

Bert at Hayward Lake; a little flash can make a big difference.

Top:  No flash.   Bottom:  Camera's built in flash used.
Yesterday, my friend Bert and I enjoyed a walk along part of the Railway Trail which parallels part of Hayward Lake.  It was a lovely day, complete with blue skies and no wind.  With the exception of a tumble I took into some blackberry bushes, we had a great time.

I photographed my friend while enjoying the quiet of the shoreline.  The sun was just off to the left of the camera; you can see how Bert's face is partly in shadow.  I had my camera set to manual exposure mode, and was using a polarizer filter to help bring out the colour of the leaves and sky.  I took two photographs.  One without the built-in flash and one with it. 

With the harsh lighting producing strong shadows, I decided to take two photographs.  The first was an exposure without using fill flash, the second used the camera's built-in flash to soften the dark areas on my subject.  I often will take two shots of something, a before and after picture of sorts, where I will change one camera setting between shots.  It can be focal length, aperture or shutter speed, flash, or perhaps ISO.  Investigating the differences afterwards helps me understand the nature of photography.

No flash was used in the top image.  You can see the dark shadows present on the face, shirt, and jacket.  I popped up the camera's flash for the second photo.  It filled the scene nicely, rendering the face, shirt, and jacket with less shadow.  Using flash in this way is called fill-flash, and it can make an enormous difference in way an image looks.

Built-in flashes are, by their very nature, weak.  They often will not have enough power to properly illuminate a subject that is too far away, shot using a small aperture, or diminished because of flash or lens filtering (such as a diffuser or a polarizer filter).  Even so, they often will make a small difference; enough to have a significant impact as in the situation above.  I used a wide angle lens (28 mm on a full frame camera) so I was relatively close to my buddy.  The aperture was as wide open as I could get it as my shutter speed was set to 1/200th of a second, the camera's flash-synch speed.  These helped to make the flash somewhat viable, even though it was not quite powerful enough.

Next time you are out shooting in the sun, try popping up your flash when shooting portraits.  If you are using your built-in unit, be sure to:
   - pop up the flash
   - use shutter priority
   - set the ISO to 100 if possible
   - turn the command dial to get the highest shutter speed possible (1/200 or 1/250 usually)
   - make sure any hat you are wearing does not push the flash down a bit as it might not actuate
   - use a wide angle setting
   - be sure you are modestly close to your subject (4 - 6 feet)
   - try not to shoot in a strong backlit situation (sun not visible in viewfinder)

Take a couple of shots, one with and one without the flash.  Then look at your images.  Enlarge them to see details on faces.  Was there a difference?  Congratulations, you just used fill flash successfully!
  - 

Friday, September 27, 2019

Changing perspective - how to make small look big.

A Resort in Golden, BC; left - 16 mm close to stairs.  right - 35 mm away from stairs.
You can alter the relationship between the foreground, subject, and background of a scene by changing the focal length of the lens and your position relative to the foreground.  A good example of this is in the pair of shots above.  I used an ultra-wide lens on my full frame camera for the left shot.  I set it to 16 mm (which is equivalent to about 11 mm on an aps-c sensor camera).  I also was very close to the stairs, in fact only a foot away or so.  Wide-angle lenses, especially ultra-wides, cause distortion and make the foreground look larger relative to the background.

In order to capture the image on the right, I backed up quite a distance (about 15 feet or so) and zoomed in.  With the focal length now at 35 mm the foreground was considerably smaller than before, and the background seemed to magically grow in size.  In order to fully understand the effect, notice that the bottom stair in both shots is the same.  There are four steps on the left and four on the right.  These are the same stairs.  They look so different because of the change in focal length and position.

Although brand-name full-frame ultra-wide lenses are expensive, third party ultra wides for aps-c sensor cameras are very reasonably priced.  For example, Nikon's 16 - 35 mm ultra-wide lens for full frame cameras runs around $1,500 while Sigma's 10 - 20 mm for aps-c sensor cameras costs around $530.  The Sigma lens has a relative focal length (compared to a full-frame camera) of 15-30 mm, so the Sigma lens provides a very similar field of view to the Nikon, with a tiny bit more at the long end.  However, for the economically minded, the Sigma lens represents a savings of 65% and is also much smaller and lighter.

One of the big questions to ask yourself in acquiring such a lens is, "How much will I use it?"  Spending a small fortune on an awesome lens may not be justified if it is going to sit at home in your camera bag most of the time.  Although I love brand name lenses and have never been disappointed, their cost is often prohibitive.  I get around this by buying them used, although there is a risk in that.

You will find an ultra-wide angle lens will be a welcome addition to your arsenal.  It is an especially great lens for landscapes and architecture shots.  I love how you can manipulate foreground and background relationships.

Thanks for reading.   www.ericspix.com

Tuesday, September 24, 2019

Fill flash on the trail.

Paul during a hike at Minnekhada.  Left no flash, right fill flash added.
I have spoken about the benefits of fill flash before, but its value is so often forgone that it is well worth repeating.  Flash can make an enormous difference in many situations, even if the camera isn't suggesting its use.  In full auto mode, the camera will often pop the flash up when a low light situation is detected.  In other modes you may see a sign inside the viewfinder or on the LCD screen indicating that flash is warranted.  In automatic modes the flash is directly controlled by the camera and often cannot be suppressed or raised in contrary situations.  This is one of the reasons I so strongly suggest learning to use semi-automatic modes like aperture or shutter priority.  I often use manual mode as it provides even more control.

The trick with using flash though is very much dependent on the nature of the existing lighting, the camera, and the settings it is at.  It can be all very technical, but we can look at this from a more simplified perspective.  Shaded areas (such as the situation above), open areas on cloudy days, and indoors are all times when using your built-in flash can make a difference.  Brighter environments often benefit from a more powerful external flash, especially in cameras with a flash synch speed.

The second thing is to be closer to your subject rather than farther away.  Generally, this means keeping focal lengths.  A wide angle or mild telephoto setting will work better than zooming in more because it allows lower apertures to be used and deeps the flash-to-subject distance within the working distance of the flash.

Keep the aperture low.  Smaller apertures means the flash has to work harder; since built-in flashes have a relatively low amount of power ("brightness"), the lower the aperture number the easier it is for the flash to light something up.

Increasing ISO can improve flash distance, but it will only work with electronic shutter cameras, especially in bright situations.  In dim circumstances, a higher ISO will always allow your flash to go further.  As it gets brighter, especially with mechanical shutter cameras (DSLRs), increasing ISO has no effect.  An external flash is the only way to go in these cases.

Using a flash to fill a scene is easy.  Pop the flash up and take a picture.  If the flash won't come up, you will have to switch to a mode where it is allowed.  Portrait mode often works.  I will often take two pictures as you see above.  One with flash and one without.  Sometimes the flash makes no difference - so what is there to lose?  Other times though it makes a huge difference.  Aren't you glad you tried?

Thanks for reading.   www.ericspix.com

Monday, September 23, 2019

Telephoto lenses and backgrounds.

Tiger lily; same flower but shot from slightly different positions.
Focal length relates to the power or magnification of the lens.  A "normal" lens makes the foreground and background appear to be the same relative sizes.  A wide angle lens distorts the foreground and makes it look larger relative to the background than it does to your eyes (aka normally).  A telephoto lens makes the background larger relative to the foreground; it "compresses" the scene and makes it appear that the background is closer than what it actually is. 

It is this compression that I am talking about today.  As you zoom your lens in to magnify a subject you will notice that the background becomes progressively smaller.  You are enlarging both the subject and the background.  If you magnify the image by a factor of 2x the background decreases in its area by a factor of 4x (square of the magnification).  This had the advantage of being able to zoom in as much as you want and to control how much of the background you see.  More zooming means less background.  The tradeoff here though is that you have to be farther away from your subject because zooming in increases its size.

The beauty of this relationship is that, with increased magnification, you have greater control of what is behind your subject.  In the above photos of a tiger lily, I was back quite a distance and was using a relative focal length of 600 mm to magnify the subject.  That focal length also minimized the size of the background.  The nice thing here is that it was easy to pick what I wanted it to look like.  A small movement on my part produced a great relative movement of the background and allowed me to go from a mixed white and green background (right) to a fully green one (left). 

A property of zooming in has to do with depth of field; more focal length means less depth of field at any given aperture.  In a situation where an out of focus background is desired a longer focal length will be preferred.  If you want lots of background and depth of field stay with a wide angle setting on your camera.  You will not be able to affect the nature of the background though without major changes in position.  If you want a small area in the background that is blurred zoom in.  Small changes in your position will produce a major change to what is happening behind the subject.

Thanks for reading.   www.ericspix.com

Wednesday, September 11, 2019

The benefits of RAW.

The Highway 7 bridge between Mission and Abbotsford
Sometimes my images just come out all wrong.  In the above photo, I had unintentionally underexposed the photograph.  The top shot is how the unprocessed raw image.  You can tell by looking at the histogram (top right) that it is underexposed because the graph is pressed up against the left side while the right side has no data at all.  If you look at the slider controls below the histogram, they are all set to "0".  This means no changes have been made to the file.

The lower image is the same as the top one, but the slider controls have been altered.  The histogram now has a nice balance across the whole graph, and no end is empty or has data bars jumping off.  The image is clearly better.  Raw images are very flexible when it comes to altering an exposure.  This is because there is data present which would normally be lost when shooting jpegs.  This isn't to say that you cannot make changes on jpeg files, it is just that you will lose details in shadow and highlight areas which raw files will retain.

This doesn't mean that exposure doesn't matter.  You always want to do the best job you can in making an image.  Each error in making the image affects the final outcome, even if there is a certain amount of latitude.  Noise, fine detail distinction, and contrast are all adversely altered. 

The disadvantages of a raw file over the ubiquitous jpeg are many.  Raw images are larger, require post processing, and often are not readable without the correct software.  Raw files created by newer cameras may not be supported in older software, meaning that you will have to rely on conversion software such as Adobe's DNG Converter to access them.  All these issues pale in comparison though to their benefits.

Raw files give the user much greater control in colour balance, sharpening, and selecting the correct amount of image correction on a picture by picture basis instead of having to alter these values in camera.  There are fewer artifacts due to the lack of compression.  I especially love the greater latitude as mentioned above.

Keep in mind that not all raw files are the same.  I have found that compacts sporting raw capability do not measure up to the image quality produced by larger sensor cameras.  In general, it can be said that larger sensor raw images are superior to similar pictures created by smaller sensor cameras.  This is especially true once you drop below a 2:1 crop factor.

Saturday, June 29, 2019

A shift in perspective in Chehalis

The St. Helens Apartments, Chehalis

Yesterday we went into the small town of Chehalis, Washington.  It is quite quaint and there are lots of old buildings which have been kept up.  I particularly liked the St. Helens Apartments, which has an antiquated outside fire escape.  The most interesting feature of the building though is its irregular quadrilateral shape, with one end being very narrow and the other end is quite wide.

The image on the left was my original shot.  Without a PC (perspective control) lens it is almost impossible to capture a tall building without showing significant signs of perspective.  Perspective is the appearance of objects getting smaller as they get further from you.  We see it all the time in stretches of railway or road as they move away from us, becoming little more than a hairline in the far distance.  Buildings suffer from this form of distortion because we are much closer to the bottom than the top.  In the shot above, I am also closer to the left side than the right side, and so the image suffers from perspective along two planes.

I used Photoshop to correct the distortion by evoking the perspective editing tool.  This helped me compensate for the vertical change in perspective.  I used the distort editing tool afterward to give the building its apparent height, as I find changing perspective usually gives the image a squashed appearance.  Lastly, to compensate for the left to right change in perspective, I employed the use of the skew editing tool.  Together the changes produce the image you see on the right.

Although the left image is what my eye saw, it is the right one which I saw in my mind’s eye – the way it should look if perspective was not an issue.  Of course, I played with white balance, contrast, exposure, curves, and a few other tools to get the shot just the way I wanted it.  This is precisely why I shoot in RAW mode; it gives me the greatest post editing potential without compromising the image significantly.

Thanks for reading.   www.ericspix.com

Saturday, June 22, 2019

Bromeliads and Bros - a sense of scale.

My friend, Charles, posing by a tree covered with bromeliads.
Bromeliads are fascinating plants.  There are somewhere between 1500 to 3500 species, depending on which website you want to believe, and they range from the very small to the incredibly large at over 33 feet tall.  While we were in New Zealand we were thrilled to see numerous bromeliads growing, always on trees.  Not all bromeliads live on trees; pineapples grow in the soil of course.

The bromeliads we encountered are epiphytes.  These symbiotic plants form a commercialistic relationship with their hosts, neither hurting or harming them.  The bromeliads use the tree only as a substrate - a place to anchor themselves - and do not parasitize the tree in any manner.  As an epiphyte, the bromeliad obtains its nutrients from rainwater, the air, and organic matter which happens to fall upon it. 

We came across a remarkable collection of these tree-loving epiphytes perched on a tree overhanging a marine lagoon.  I took two shots, one with my friend and one without.  The shot with my friend gives a sense of scale to the plants, while the one without leaves you guessing as to how large they actually are.  I also like the fact that the left image is more personal and meaningful in nature while the right one could have been dug up on a google search. 

When you are out taking pictures, consider shooting scenery or evidence at to your location both with and without someone in them.  I could have a photograph of bromeliads, which would become more and more meaningless over time, or a shot of my "bro" with the bromeliads, which would maintain its value.  The great thing about both shots is that you can use each for something different, depending on what your exact needs are or will eventually be.

Thanks for reading.   www.ericspix.com

Wednesday, June 19, 2019

Flash at night - pros and cons

An evening on the West Coast Trail
Using flash at night, or even at dusk, has both advantages and disadvantages.  The power of the flash, the distance the subject is away, and the ISO of the sensor all dictate its working distance.  As you can see in the top photo the background becomes darker as distance increases.  The foreground is nicely lit up and allows a fast shutter speed to freeze motion.  You can see my daughter, Leanne (far left) playing with her fire stick - the moment is captured in time.  Without a flash, the shutter speed must decrease significantly.  In the bottom image, you can see her significantly blurred as her play is slowly rendered.  Flash freezes action and illuminates the only foreground.

When flash is not used in very low light situations long exposures are required.  The other option is to use high ISO values, which produces a great deal of noise.  The amount of noise produced is highly variable, but smaller sensors and longer exposures increase it as well.  I prefer to use low ISO values with long exposure noise reduction turned on.  The bottom image was shot at 100 ISO for five seconds at an aperture of f/5.0.  Even then it is somewhat underexposed, but I wanted to capture details in the fire.  The relative darkness of the event helps set the tone of the shot, which is lost when flash is used.  Not using flash blurs action and gives natural light the task of exposing the image, producing a softer, more evenly lit scene.

You also have to consider the need of a tripod or some other way to immobilize the camera when doing long exposures.  Vibration compensation helps mitigate blur due to a camera being handheld, but only within 3 or 4 stops of the standard 1/shutterspeed rule of thumb.  With a focal length of 45 mm on a full frame camera, a shutter speed of 1/50th of a second would suffice with no vibration compensation or a shutter speed of 1/5th of a second with it.  At 5 seconds the entire shot would be ruined if it was handheld, vibration compensation or not.

At the end of the day, it is always a good idea to try to do things in multiple ways.  Experience tends to be the best teacher; I have always found it is the best way to learn.  Of course, it takes time and some degree of organization to do this.  As well, you have to take your camera off full-auto because it will dictate how the shot will be orchestrated.  It will mean having to pay attention to settings and even understanding what they all mean.  Scary for some, but it is the best way to learn.

Thanks for reading.  www.ericspix.com


Monday, June 3, 2019

Time of day – shooting a creek at noon and at dusk

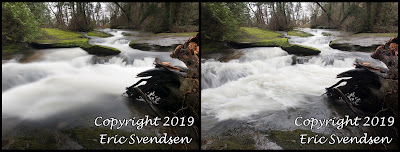
Left:  3.2 second exposure at noon    Right:  5 second exposure at 8:00 pm

Photography is the art of capturing light, and the nature of that light is very important in how the resulting image will appear.  Time of day affects the process because of the angle and intensity of the sun.  A cloudy day may make the difference somewhat moot, but there are still differences, although significantly subdued.

The above two images were shot from the same point of view and focal length, but the one on the left was photographed over eight hours earlier than the one on the right.  The sun was clearly in a different position relative to the scene.  Close to noon, the first one has significant shadows and highlights.  In fact, I had to use a graduated filter to diminish the brightness coming from the far bank, which was exposed to full sun.  That part of the scene was dodged by a full two stops, receiving only 25% of the light the rest of the image did.  Even then, it is still a titch on the bright side.  Conclusion:  midday exposures in full sun suffer from intense contrast and vast differences in shadow and highlights.  Early and late day photos are much less intense this way and do not require as much in the way of burning, dodging, or filling with flash.

There is a second difference.  The second photo was taken near 8:00 in the evening.  An aperture of f/10 was used with a shutter speed of five seconds; I needed to use a three-stop neutral density filter to take it from 0.4 seconds to 5 seconds to blur the moving water the way I wanted.  The noon photo was at f/11 with a shutter speed of 3.2 seconds.  However, it required a six-stop neutral density filter to achieve a proper exposure.  There are about four stops difference between the amount of light falling on the image in shade at noon and at 8:00 at night.  More if you consider the full sun exposure (about 7 stops).  Full sun shots are great for fast shutter speeds but lousy when wanting to use low ones.  Conclusion:  if you are wanting longer shutter speeds, consider shooting early morning or late afternoon.  If you do not have a neutral density filter, earlier or later is better.

There are subtle differences in white balance, water flow, and human activity as well.  These factors may play an important part in the final product, depending on the circumstances.  In general, I like to shoot early in the morning for a number of reasons.  Good light without harsh shadows, few people mulling about to get in the way, and my energy level is better.  If you can plan when you are going to shoot, you will end up with better pictures.

Tuesday, May 21, 2019

Clarity - also called mid tone contrast.

Cascade Falls, Mission.  Left:  low clarity   Right:  high clarity
I drove out to Cascade Falls yesterday with a friend of mine.  It was a wet, soggy day with little promise of blue skies.  Uncertain of what weather lay ahead, but determined to overcome whatever was thrown at us, we proceeded stout-heartedly towards our goal.  The truth is I considered whimping out a couple of times but was persuaded by my sodden-proof friend that such was the life of explorers.  So, we made our journey to the falls' parking lot where we donned what rain resistant gear we had and began our trek.

If you have never been to Cascade falls it is well worth the trip.  The round trip to the site really only takes fifteen minutes or so, and the trail is well established.  No mud and little in the way of foot entanglements.  The area is cordoned off so that anyone attempting to access the river will be thwarted by well maintained chain link fences.  Only those willing to scurry over or under them can make it there; the slope and river itself is very dangerous and staying on the walkway is highly recommended.

I got off a number of shots.  The above one was taken with a Panasonic bridge camera with an ISO of 80, a shutter speed of 1/25th of a second and an aperture of f/2.8.  The wet weather produced a low contrast scene.  I typically use a RAW camera setting and did so here as well.  I post processed in Photoshop CS 6.

If you look carefully at both images you will notice that they are, in fact, one and the same.  The same file was used to produce both images.  The difference between them is that the left one had a clarity setting of around -35 and the right one had a setting of around +18.  Mid-tone contrast, also called clarity, is a setting which alters the contrast of middle-value tones.  There are typically three tone ranges.  Highlights are the brighter values, shadows are darker values, and mid-tone are the values in between.  

Altering mid-tone contrast has a number of benefits.  Lowering it gives the image a decidedly softer feel.  I use low values in portraits and in places where I want to take the harshness off surfaces and edges.  In places where the scene would benefit from better definition and distinctive surfaces I use positive values.  Look at the waterfalls carefully.  You will notice the left one is much softer and the water appears almost misty.  The right one appears more like a thunderous avalanche of water.  I prefer the left one.

Not all editing programs offer the ability to change mid-tone contrast.  Photoshop and Elements both have it.  If this is a feature that is important to you, consider looking to see if what you have, or hope to acquire, does.

Thanks for reading.    www.ericspix.com

Thursday, May 9, 2019

Use of a polarizer filter.

Dike at end of 216 St, Maple Ridge.  Left:  no polarizer   Right:  polarizer used
If you are at all like me, winter has not encouraged you to take many photographs.  With spring fully entrenched and summer lurking around the corner, you leave your ensconcement seeking sun and fresh air.  You find yourself outdoors.  Beauty abounds.  The landscape unfolds before you; blue sky meets forest and water.  It is time for the camera to come out.  Before you run out ready for action, you should make sure the battery is charged and you have a memory card in it with lots of room.

Out with camera in hand, you snap a few shots.  They look pretty good, although it seems a little less brilliant than the way you think it should be.  The colours are not as vivacious as they could be though, and they seem to off somehow.  Right beside you, a friend has the exact same camera, and all the settings are exactly the same (amazing); the only difference they are using a polarizer filter (since polarizers are grey in colour they actually reduce the light coming into the camera, so your friend's settings would be a bit different, but close).  You compare images - wow!  Look at the difference between the two shots!

It was, of course, the polarizer which did it.  I have discussed polarizers before (click here), but a brief review is in order.  Polarizers take out light which has been polarized along some plane.  Rotating the filter changes which plane it removes polarized light from.  It turns out light from open sky is very blue; it is also polarized light.  Used correctly, the polarizer will take all that extra blue light out of your image.  The result gives truer colours and better contrast. 

The trick with polarizers is to know when they will help.  They tend to be ineffectual on a cloudy day, although they will still help with reflections off surfaces, including water.  On sunny days they take the blue tint out of shadows and darken blue skies.  They will not darken all skies however; much of that depends on the time of day and the direction you are shooting relative to the sun.  You get the best results when the sun is behind you and not straight overhead. 

If you get a polarizer, try this:  Go out on a bright sunny day, mid-morning is fine.  View the sky and landscape with your camera.  Rotate ring on the the polarizer filter 180 degrees.  Change your position by rotating yourself to get a different part of the scene in the viewfinder and repeat with the polarizer.  Move, rotate, move, etc.  Pay close attention to how the polarizer affects the image.  You will notice that the polarizer makes the most difference when the sun is behind you but off to the side.  Do the same thing at noon and then later in the afternoon. 

I try to be careful with polarizers when using ultra-wide angle lenses, or when doing panoramas.  Since they perform differently depending on your angle to the sun, they will cause your resulting shots to be unbalanced.  I often remove polarizers when doing this type of photo, when using flash, and when shooting in low light.

Have fun, and keep on shooting.  www.ericspix.com

Thursday, April 25, 2019

Using perspective and skew in Photoshop.

Left:  Church before correction    Right: Church after correction
Have a look at the above images.  The exposures are one and the same.  The difference between them occurs after the file has been accessed by photoshop.  What are the differences, why do they matter, and how did I do them?

The image was taken off center, mostly because it was a better position to shoot from and I captured more of the flowers on the left side of the door (you can see them if you look carefully).  Shooting it off center caused the roof line to appear at an angle.  I used the skew command in Photoshop to line this up parallel to the top of the frame.

With height comes a reduction in the width of any building, which is why the church's tower is smaller at the bottom than the top.  This is the normal effect of perspective.  You can use a PC (perspective control) lens to correct it in camera, or use a bellows with the ability to angle the lens; something present on some large format cameras.  My solution was much more economical.  Use the perspective control in Photoshop to widen the top of the image.  It worked fine.

The problem this produces though is that it makes the church appear squat because now the width is the same all the way up but the height is wrong for the proportions.  For this I used the distortion command and lengthened the whole image, stretching the church.  The downside to this is that everything gets stretched, not just the upper part of the church.  If there was a way to stretch the image proportionally, with none at the bottom and an increasing amount over the height of the image, the effect would be much better.  However, it works well for the most part.  This is why the image on the left is shorter than the image on the right.

Finally, there was the issue of the missing corner.  When the skew command was issued the upper right part of the image became barren as no image data was available for it.  Fortunately, the missing section was only sky and it was a simple matter of using the clone tool to patch up that part of the photo.  I think the corrected version looks much better than the original.  What is your opinion?

Monday, April 22, 2019

The making of a monster.

If the monster was to talk, what would it say?
We were at Coombs market yesterday.  Its most renowned feature is the fact that it has a grass roof which hosts goats during the summer.  The whole area is perfect for the eclectic shopper.  As usual, I was packing a camera and discovered an unexpected subject; a one-eyed monster tree.  The original picture, unedited, is on the left.

That was the picture my mind saw the moment it popped into my visual field.  It only needed a second eye, which I knew Photoshop could address.  After bringing the image back to my computer, thought became a reality.  That's the image on the right.  Now I needed a caption.

That's one of the fun thing about interesting photos.  The meaning or effect of an image can change completely with the right words.  Consider some of the possibilities:

  "Squirrel!"
  "That's E-N-T, not A-N-T."
  "Keep that dog away from me!"
  "That was a tasty kite, Charlie Brown."
  "My roots!  Where are my roots?"
  "... and the green grass grew all around, all around, and the green grass grew all around."
  "OK goat, just a little closer to the edge."

If you think of a caption, won't you please attach it as a comment.  Thank you.

Saturday, April 20, 2019

Bowen park waterfalls and a neutral density filter

Bowen Park Waterfalls, Nanaimo
A neutral density filter is a grey filter, completely neutral in colour, which attaches to the front of your camera lens.  Its sole purpose is to allow you to use slower shutter speeds than what you would otherwise be able to.  You would not make use of one normally, as shutter speeds are often slow enough as it is.  Most people don't have one, or may even not know about their existence.

The top image was taken early in the morning without an ND filter.  The exposure time was 0.3 seconds.  This is slow enough to allow some blurring of the water's movements.  It produces a pleasant effect.  The bottom photograph was shot using a neutral density filter; the aperture and focus points are exactly the same.  The shutter speed is significantly slower though, being a full 20 seconds.

The difference is subtle, although I prefer the longer shutter speed over the shorter one.  I love how the rocks and moss in the stream stand out from the blurred water.

I have a confession.  The camera I used was a 1-inch sensor bridge camera; a Panasonic FZ2500 camera which comes equipped with a virtual neutral density filter.  A small switch on the side of the camera reduces the amount of light hitting the sensor, allowing you to shoot slower shutter speeds.  The switch was set to the 1/64 value - a 6 stop reduction in light.  If you take the 20 second exposure from the bottom image and divide it by the 0.3 second exposure from the top, you get 66.7 - close enough to the 64 times light reduction.

I have a variable neutral density filter which I use on my DSLR lenses.  It does the same thing, although it has the disadvantage of putting extra glass between my subject and the sensor plus being an extra thing to buy and carry to boot.  I have to admit to liking the sliding switch feature on the all-in-one camera though. 


Tuesday, March 26, 2019

Benched in Tortuga

Top:  bench in Tortuga  Bottom:  Kathryn on the same bench
When I see something that appeals to me visually, I want to photograph it.  I loved the scene facing us (top) while visiting Tortuga last year.  It was colourful, had clean lines, and was simple yet attractive.  It was populated with simple objects each of us takes for granted.  To top it all off there was an easy way to compose the image, facilitating the rule of thirds and framing.

Clearly though, something was missing.  The large open space to the left of the window was begging for a subject; anything really.  It was a gaping hole in an otherwise wonderful setting.  The solution was to incorporate a person, and I knew the very one.  One of the things I frequently do is to photograph something without someone in it, then repeat the process but this time with a person.  The change was dramatic.

Although the same void existed, there was now a dominate subject which displaced its presence (bottom).  Instead of the eye finding an empty quadrant, it found a person.  This deflected your attention in such a way as to change the entire composition.  The great news here is that it is an easy fix.  It accomplishes the goals of changing the anchor point in the image and adds a personal touch.  The reality is that the top photo would mean less to me over time while the bottom one would forever carry the image of one I love.  How poignant. 

This idea then is the basis of this blog.  Shoot as you see fit, but remember to put people in your shot some of the times.  Photographs of things or places will always carry with them a certain degree of appeal or nostalgia, but it is the people in our lives that gives them perpetual meaning.  Selfies are, of course, all the rage, but often leave out important methods of producing fetching photos.  A tripod, a little time, and some instructions on your part will likely produce far more rewarding images with you as the centerpiece, along with whoever accompanies you.  I suggest taking two shots, one with people and one without.  Compare them over time; the one with family and friends will almost certainly become the most favourite over time. 

Thanks for reading this.            www.ericspix.com


Saturday, March 23, 2019

Flash and the beauty of no synch speed.

Top:  no flash was used.  Bottom:  built-in flash used.
I have spoken on the merits of fill flash, and will likely do it again because of how much it improves an image, even when its use is not mandatory.  Today I want to talk about the difference in using a DSLR camera which is limited by something called a flash synch speed and using a non-SLR-type camera which is not.  Normally I would sing the praises of the DSLR because of the larger sensor and the ability of it to take accessories such as other lenses and external flashes.  This is one place where non-SLR cameras have an advantage.

To understand what a flash synch speed is, you first have to comprehend why it even exists.  DSLR cameras use a mechanical shutter to allow the camera's sensor to be exposed.  It is a physical mechanism which opens and closes using "curtains", which block light when present in front of the sensor.  When a photo is taken, the first curtain travels across the sensor plane leaving the senor open for an exposure to take place.  The first curtain remains open until the exposure is complete, then the second curtain moves and finishes off the job.

They travel independently of each other as long as the shutter speed is at or below the flash synch speed.   This tends to be between 1/180th to 1/250th of a second, with most cameras using 1/200th of a second.  At shutter speeds faster than the flash synch speed, the shutters move in tandem, the space between them guided by the shutter speed.  Faster shutter speeds require that the two shutters are closer together.  To see a video on this, click here.

The problem starts when flash is used.  At shutter speeds at or below the flash synch speed there is no problem because the entire shutter is open.  At speeds above this, only a portion of the shutter is open at any moment and the flash will illuminate only a portion of the image.  To prevent this your camera will limit the shutter speed when the flash is popped up or an external one is attached.  If you use an off-camera flash which is not dedicated, the camera will not be aware of a flash.  This means you can go above the flash synch speed, but with a consequence.

Enter non-DSLR cameras.  Compacts usually use non-mechanical shutters.  They are electronic in nature and use no moving parts.  They do not have a flash synch speed and so higher shutter speeds can be used in situations involving flash.  This is where the photos above come in.

Both shots are done with an ISO of 80, an aperture of f/3, and a shutter speed of 1/1000 of a second.  The top photo is not an issue as no flash was used.  The bottom image does involve flash, however.  The camera was a bridge camera; it is an all-in-one camera that uses an electronic shutter instead of a mechanical one.  A shutter speed of 1/1000 of a second is not a problem.  The question you may have at this point is, "So what?   Why is it a problem?"

The short answer is aperture.  It was very bright, and the shutter speed of 1/1000 of a second allowed me to use the low aperture of f/3.  This means the flash can further and impact shadows a greater distance from the camera.  With a shutter speed of 1/200th of a second, my minimum aperture would have been around f/7.  Light travels less than half the distance at that aperture, and it is likely there would not be enough of it to properly illuminate the scene.  The built-in flash of a DSLR camera would not be able to work to its full potential because of the limitations of flash synch speed.  There are two ways around this though.  One is to use an external flash on a DSLR or to use a feature called high flash synch speed, which is not available on all cameras.

Sunday, March 17, 2019

Which is the correct white balance?

Old horse-drawn wagon, Lake Nakamun, Alberta
Before you are two images, each differing by one single factor.  They have both been white-balanced to the snow, but the colours are clearly different.  So what is going on?  Snow is, after all, supposed to be white. 

Although we think of snow as being white, it can actually be many colours.  In places where coal is used extensively the snow takes on grey hues.  A certain species of protozoa is red in colour, and when present in significant numbers dyes the snow its distinctive shade.  Compact snow, converted to ice, may lose the dissolved gasses originally present and take on its familiar blue tones.  Then there is yellow snow - we all know what that means.

The property of snow that we need to understand is that it reflects all wavelengths of visible light.  If you were to place a string of  Christmas lights on the snow at night, the snow around each light would reflect the emitted light displaying the associated colour.  That is what is happening here.  Direct sunlight has a relatively even balance of light making up the spectrum.  The brighter areas of the scene are lit by it.  The shaded areas, on the other hand, are illuminated by the sun indirectly.

Indirect sunlight will bear the cast of wherever the light comes from.  On a sunny day shaded areas receive reflected light from areas immediately around them, but more importantly, the bulk of the light comes from the open sky above.  Blue sky carries with it more blue than other shades.  Just like a blue Christmas light will cause snow around it to turn blue, the light from open sky is also mostly blue.  The result is light in shaded areas on sunny days is predominately blue.

This brings us back to the shots above.  The top image was colour balanced to the snow in shade, which resulted in having the blue colour cast removed.  Look at the wagon; notice how the wood seems a more natural tone.  The bottom image was balanced using the brighter sunlit snow, causing the shaded areas to appear bluish.  Compare the wagons in both shots and you will see that the bottom wagon is also very blue for the same reason.

Here is the general thought then:  Colour balance for the subject.  If the subject is in shade, balance for that light source.  If the subject is in sun, then for that source.  This works well for the most part, although there are exceptions to everything.  I prefer the top photo because the wagon is not maligned with the blue colour cast of shadows.

Thanks for reading.


Thursday, March 7, 2019

Perspective on Paihia

Changing focal length in Paihia, New Zealand.   
If you go to New Zealand, and happen to visit a quaint little area known as Paihia, you will find this sword fish statue posing for your shots at town center.  I photographed the above images using a Panasonic FZ2500, a bridge type camera with a one inch sensor.  The actual focal lengths were quite a bit lower, at 8.8 mm for the wide angle shot and 60.4 mm for the telephoto shot.  The crop factor for the camera is 2.72, meaning that if you take any actual focal length for the lens and multiply it by its crop factor number, you will get the relative focal length on a full frame digital camera.  So in this case, 8.8 mm (actual focal length) times 2.72 (the crop factor) gives about 24 mm (the relative focal length).  A full frame digital camera with a 24 mm lens will give the same field of view as a one inch sensor camera using an 8.8 mm lens.

In order to get this type of photo you need a couple of things.  First of all you need a camera with a zoom lens which has the ability to change its focal length from a wide angle  to a telephoto.  Then you need two subjects, one closer to you and one farther away.  Lastly you have to position yourself so that you are close to the front subject with the back object lined up in the camera's viewfinder.  When that is all done, you are ready to go on to the next phase of the shot.

At this point you set the camera's lens to a wide angle value; generally accepted as being below or at 35 mm relative.  In this case I used a 24 mm setting.  I was close to the sword fish and made sure the island at the back was in my viewfinder.  Click.  The first shot is done.

This then is the key.  You have to move back and zoom in.  The distance you move back depends upon a lot of factors.  Without getting into details, it is all based upon ratios.  The zooming in enlarges the foreground subject.  If you zoom in the right amount that object should be the same size in your viewfinder as it was in the original shot.  Since the distance between the foreground and background object has not changed, the background appears larger relative to the foreground.  This is called compression because it looks like you are compressing the distance between the two subjects.  Again, it is all based upon ratios.

Click.  The second shot is now complete.

If you did this right your foreground in both shots should be about the same.  The background will look significantly closer though in the second shot - it is quite an earth-moving experience.

Monday, February 25, 2019

Dragons, a wizard, and a flash

Flash angle can really affect the mood of a shot.
It is quite amazing how light can affect the way something looks.  The quintessential evil photo is done by illuminating the subject from in front, below the camera lens.  Photographs with flash from the side give a subject greater depth and intrigue.  Fill lighting, which can be done with secondary flash units or reflectors, allow details to emerge which otherwise would be lost in deep shadows.

The main source of light in the above shots was an off camera flash which was tethered (connected via a cable) to a camera to allow regular TTL (through the lens) operation.  Essentially it means that you have to point the flash at the subject from whatever angle you want to illuminate it from on the one hand, and shoot it with the camera on the other (both figuratively and literally).  The left image was photographed with the flash held below the camera and slightly to the right.  The right image was photographed with the flash further to the right and elevated.

It is quite amazing how light and shadow can affect an image.  You can take a child's cute toy doll and turn it into Chuckie with lighting alone.  If you happen to have a flash which does not have wireless capability, you can pick up a fairly inexpensive cord allowing you to tether it to the camera.  You can buy brand name stuff or third party equipment from a variety of suppliers.  I have bought stuff from Vello before and found it works well.

One of the best ways to learn about the wonders of flash is to play with it and see what neat kinds of things you can do.  Add a few simple refelcters for secondary light and you will be amazed at what you can achieve.

http://www.vellogear.com/           search for off camera TTL flash cable

Thursday, February 21, 2019

shutter speed and moving water

Millstone creek, Nanaimo
You are no doubt familiar with the quintessential photograph of blurred water running through its course, which in contrast is in clear focus.  The question which is often posed is, "How did they do that?"  The answer comes down to shutter speed.

The two photos above were both shot with a camera mounted on top of a tripod.  A tripod was necessary due to the slow shutter speed used on each picture.  The one on the right was already modestly slow, being only 1/6th of a second.  It shows some blurring of the water but nothing like the image on the left.  It was photographed at a full 15 seconds.

The difference is stunning; things that are not moving have not been affected at all - part  of the reason for the tripod.  The water shows a vast difference.  Longer shutter speeds produce greater degrees of blur.  It is possible to go too long, as eventually all distinction would be lost in the moving water.  The length of time chosen and the resulting effects are based upon a great many things.  How close the camera is to the water, how fast the water is moving, and how much water there is are all factors.  I often find that 5 seconds is long enough; I wanted this one to be longer to really show the impact of slow shutter speeds.

There is another thing going on which won't be noticed unless you really understand the nature of light and the camera.  There is no way that a 15 second shutter speed is possible during a normal day.  There is just too much light present.  The aperture for the right image was f/11 and for the left was f/16.  ISO was unchanged.  There is only 1 stop difference in aperture, but about 6 1/2 stops difference between shutter speeds.  How is this done?

The answer is a neutral density filter.  A N.D. filter is a darkened filter which allows the photographer to use slower shutter speeds than otherwise possible.  The one used was a variable neutral density filter, whose values can be changed from 1 stop to 10 stops.  The result was to allow the camera to shoot at a very much reduced shutter speed.  These are especially handy on bright days when you just can't get the speed down. 

Wednesday, January 30, 2019

Flash makes a difference.

Sydney Opera House - filling with flash
The above photos could be used to illustrate a variety of photographic principles, but the one I really want to talk about is using flash.  Everyone should be comfortable with the idea of using flash to brighten a scene when there is not enough light.  What might surprise you though, is that flash is actually very useful even when your subject is already well lit.  There are a few reasons for this, but the biggest one of all is the benefit from filling shadows.

Shadow is a natural phenomenon; it occurs wherever existing light is blocked.  The lady in the top photo is dark because she is in shadow; something is blocking the light coming from the sun which is illuminating the Opera House.  Now, the photographer could have exposed for the lady, but that would leave a glowing hulk in the background which would be massively overexposed.  By exposing for the background the building came out fine, but it was the person who was severely underexposed.

The solution is to use flash.  It sounds simple enough, but in fact there are problems.  It turns out that the lady requires a great deal of extra light.  A built-in flash may not have enough power.  Fortunately, there are ways around this.   Part of it depends on equipment, part of it depends on understanding, and part of it requires some playing around.  The reality is that it takes time, and patience both on behalf of the photographer and the subject(s).

The camera being used is an important factor in achieving a proper shot.  A cell phone just can't do this well because the built-in flash can not possibly throw out that much light.  A compact with a built in flash can work, but there are certain things you have to do.  This is also true for some cameras with a non-mechanical (electronic) shutter.  If I was using a compact I would take the following steps:  set mode to aperture priority, choose wide angle, dial aperture down as low as it would go, turn on flash, take a picture and look at image and histogram if possible, adjust exposure using exposure compensation and flash exposure, possibly move closer to improve flash power (built in flash is very weak - moving closer makes it relatively stronger), try again and repeat until you have it right.  In all of this ISO may play a factor, so you could try bumping it up, but keep in mind it affects image quality if it gets too high.

If I was using a DSLR or other camera with a mechanical shutter I would consider the following.  First select shutter priority then pop up the flash.  Then make sure ISO is set to 100; some may think that a higher ISO helps, but it is thwarted by the mechanical shutter limiting shutter speed.  Set the shutter speed as high as it goes; this will be anywhere from 1/180 of a second to 1/250 of a second. Have the person move and use the exposure lock button to determine the best exposure for the Opera House.  Have the person move back into the shot and take a picture.  If the person comes out dark you have to move closer to the person, which will mean using a wider angle shot.  You could also try to bump up the power on the flash using flash exposure compensation, but if it is at maximum already you are hooped.  Repeat as necessary until you have the right shot.  Looking at the review and histogram also helps.

I forgo a lot of this by shooting in manual mode.  I know that the flash synch speed is 1/250th of a second so that is what my shutter speed goes.  I shoot at 100 ISO where possible.  My aperture would be as low as possible to give me the best image of the background.  After this is set, I would attach my external flash which has insane power.  I would then shoot at whatever focal length I wanted and check the result.  I would use the flash's exposure controls to increase or decrease power as needed and shoot again if necessary.  I find I can usually get the image on the first or second shot.

Yes, this sounds like a lot of mucking around.  When it comes down to it you have to understand that the camera usually can't do it on its own.  You have to help it.  That is why they come with so many silly buttons and a manual that has seen the demise of at least three trees.  The trick though is to play with it all until you figure it out.  It takes time, patience, and energy, but it is worth is if you want this kind of picture.

Happy shooting.  www.ericspix.com

Tuesday, January 29, 2019

Angle of view

Shooting position - it makes a difference.
When I am out taking pictures, I am always cognizant of a variety of factors.  These include the obvious things which each of us includes in our mental processing, but also things like shooting elevation.  I take a lot of my shots, as most do, of things from standing position eye level, but occasionally something extra ordinary needs to happen.

In this particular shot I did not like the background (above) which resulted in the captured image.  There was little information the viewer received regarding the subject's environment. Although I like photos of old farm machinery (who doesn't), I felt something was lacking.  I like images to tell a story, and this old derelict had something more to say.  So, to those in the car, I did the unthinkable.

I drove off road and got as close to the farmer's fence as possible.  Bump, bump, bump went the vehicle.  Disapproving looks did not prevent me from doing what had to be done.  I got into the position I wanted then it was time to do the unthinkable again.

This time I climbed on top of the vehicle.  When I had a truck I used to bring a ladder with me for such events.  However, those days were gone.  I needed a higher point of view and this was the only way possible (sitting on someone's shoulders would be way too demeaning).  I learned the hard way though that climbing up the front of the vehicle is a bad idea, as windshield glass can only stand so much force from above.  So I mounted my iron stallion from the side, as all good cowboys should.

Moving carefully and with respect to my ever aging body, I got to the spot needed and took my shot.  The perspective on the world was much better.  A little binder twine and duct tape could cement my position up here, but as such my steed required a driver.  So I climbed back down and off we went.

Some would ask, "Wasn't that a lot of work for just a shot?  I mean, you will probably never use it."  My response - "Yes it was worth it, I got a blog out of it, and a fun story to boot."  You never know when you may use a photo.

www.ericspix.com

Friday, January 18, 2019

White balance choices - part 2

How white balance affects an image
It was a perfectly clear day up near Brackendale and the sun was shining brightly.  I was traipsing around in the woods with my camera and came across a creek. The sun did not penetrate the bush above me; only the light from the open blue sky made it through.  I thought I would take a photo of the creek for fun.  The camera's white balance was set to "auto".  When I pressed "play" after taking the shot the rear display clearly presented a blue image, the one one the left.  I was shocked by the result.

My eyes did not detect the intense blue shade associated with the ice and snow.  There was some neural processing going on which prevented me from seeing the extent of the colour cast.  I then decided to use the camera's "manual white balance" option.  This is a feature most digital cameras have.  It is a little complicated to do it the first time, and referring to your manual or watching a short video on it is not a bad idea if you want to try it. 

After setting the camera's white balance to "custom" I had to tell the camera what white looked like.  I found a patch of snow in the same light and followed the procedure.  Then I took another shot of the same scene previously attempted.  After pushing play and viewing both images I clearly saw the difference between the two.

There are several options for managing white balance.  Most people leave their camera set to full automatic, which means that everything is done for them automatically.  This includes things like exposure, flash, ISO, file type, and white balance.  While capable of producing good photos, there tends to be a few things lacking; one of those things is often an accurate white balance.

The next thing step some people will take is to use a program like Photoshop Elements to adjust the white balance.  There is actually a very good utility present, Colour Cast, which allows you to improve a photo's white balance.  The up side is that the photo improves.  The down side is that it is done at the expense of data.  However, most would agree that the difference to the average person is not significant and are happy with the result.

The two best options involve going a step further.  The first one was done in the above photo the right.  The user is not on full automatic but rather on a semi-automatic or even manual exposure mode and chooses custom white balance.  Then, after setting it using the prescribed procedure, shoots the photos in that environment.  When doing many shots in the same lighting situation I will often select this option.  It always produces good results.  Then, for the final method, there is the RAW option.

RAW is a shooting mode that saves the digital file as a RAW image.  There are a host of pros and some cons for this, but for the moment we will address white balance.  RAW settings let you adjust the white balance for the image after it has been taken.  You could take 1000 shots, in each one the white balance could be different, and you could get the correct white balance for each one while you are sitting at your computer instead of having to do it, very inconveniently, in the field before each shot.  This is the way I do 95% of my images.  I don't always get the perfect white balance, but I certainly come close.  And, it turns out, to be closer than what the camera estimated on its own.

How you work with white balance is up to you.  I would encourage you to play with custom white balance.  Refer to your manual or go on line and type in the camera model and "setting custom white balance" and hit return.  You should be able to find something which helps you along the way.

Thursday, January 17, 2019

White balance and skin tones - part 1

Kathryn and white balance options - it makes a difference.
Light is made up of colours.  We know this from our experiences with things like prisms and rainbows.  We expect that light from any source can be broken up into its spectral components, and that those resulting spectrums should be equally balanced; that the amount of blues and greens and reds and all the infinite colours in between should be similarly proportioned.  After all, white light is white, isn't it?

The problem is that our eyes compensate for any colour shifts and what we see as white may actually not be.  For example, if you took a white sheet of paper and photographed it with the same white balance setting (say 5500° Kelvin) in a variety of settings, you would find that those resulting images would be different.  Even though that paper looks white to our eyes in those circumstances, it in fact is not.  This is because the light falling on it does not have an equal balance of all colours.

We know light from the sun is fairly evenly balanced, but that really depends on the time of day, the latitude, and the time of year.  When the sun is blocked by something and produces a shadow, you can still see inside that shadow.  It is not pitch black.  That is because light from the sky falls on that shaded area, allowing us to see.  That same sheet of paper would look fairly white in the sunny photograph but would look decidedly blue in the shaded one.  Take it indoors and photograph it under the old tungsten (incandescent) lights and it would look very yellow-orange.

The reason why these strange off colour balances occur is because the "white" light being produced has different amounts of the colours making it up.  For the shadow situation, there may be a lot of blue but little in the way of reds.  In the case of tungsten there will be a significant amount of yellows and oranges but little in the way of greens and blues.  Fluorescent tubes, CFLs, LED bulbs, mercury vapour bulbs, and so on all produce different shades of lighting because the balance of colours is not all the same.  We can say then that they have different white balances.

Most digital cameras have a white balance setting on them.  There is the fluorescent setting, the flash and tungsten setting, the outdoor and the shade setting, and maybe a few others.  Each one is preset to a particular white balance.  The problem is that those lighting situations are not necessarily exactly equal to what those white balance presets are.  Then there is the auto white balance setting.  The auto white balance feature lets the camera determine what white looks like.  The problem is that it is often wrong.  Sometimes it is off by a bit, other times it is off by a lot.

There are three great solutions for this.  I will go into this more on my next blog.  Thanks for reading.

www.ericspix.com